Video compression tools
Importing video files into Kolibri requires special considerations about the file size of the video resources that will be imported.
Below are some general guidelines for importing video files:
Use the
.mp4file formatUse the
H.264(a.k.a.x264) video codec to ensure video will play in web browsersUse the
aacaudio codecUse compression
Short videos (5-10 mins long) should be roughly less than 15MB
Longer video lectures (1 hour long) should not be larger than 200MB
High-resolution videos should be converted to lower resolution formats: Here are some recommended choices for video vertical resolution:
Use max height of
480for videos that work well in low resolution (most videos)Use max height of
720for high resolution videos (lectures with writing on board)
Using video compression and low resolutions is important for the context of use. Think of the learners and the device they will be using to view the videos. Consider also the overall size of the channel—how much storage space will be required for the entire collection of videos?
Let’s now look at compression tools that you can use to ensure a good video experience for all Kolibri users, regardless of their device.
Automated conversion
The ricecooker library can handle the video compression for you if you specify
the --compress command line argument to the chef script, e.g. python chef.py ... --compress.
Under the hood, the ffmpeg video conversion program will be called to compress
video files before uploading them to Kolibri Studio. Specifying --compress on
the command line will use the following default settings:
ffmpeg -i inputfile.mp4 \
  -b:a 32k -ac 1 \
  -vf scale="'w=-2:h=trunc(min(ih,480)/2)*2'" \
  -crf 32 \
  -profile:v baseline -level 3.0 -preset slow -v error -strict -2 -stats -movflags faststart \
  -y outputfile.mp4
This command takes the inputfile.mp4 and outputs the file outputfile.mp4 that
has the following transformations applied to it:
Limits the audio codec to 32k/sec
Scale the video to max-height of 480 pixels
Compress the video with CRF of 32 (constant rate factor)
Manual conversion
For optimal control of the compression options, users should perform the conversion
and compression steps before uploading their videos to Kolibri Studio.
We highly recommend the command line tool ffmpeg.
You’ll need to use it through the command prompt (Terminal in linux, CMD in Windows).
Any video conversion and compression operation can be performed by setting the
appropriate parameters.
Installing ffmpeg
Before proceeding, please go and download the ffmpeg program for you OS:
Links:
Homepage: https://www.ffmpeg.org/
Downloads for windows users: https://web.archive.org/web/20200918193047/https://ffmpeg.zeranoe.com/builds/ Choose 64bit “static” version to download, unzip the archive, then go to the folder called
bin/inside the zip file. Copy the filesffmpeg.exeandffprobe.exeto the folder on your computer where your videos are stored.
To check the installation was successful you can open a command line prompt (cmd.exe on Windows, or terminal on mac/linux), and try typing in the command:
ffmpeg -h
which will print command help information. You can see the full list command line
options for ffmpeg here: https://www.ffmpeg.org/ffmpeg.html.
Don’t worry you won’t need to use all of them.
If you see the error message “ffmpeg is not recognized as an internal or external command,
operable program or batch file,” you will have to change directory to the folder where you
saved the program files ffmpeg.exe and ffprobe.exe (e.g. use cd Desktop if saved
on the desktop or cd %HOMEPATH%\Documents to go to your Documents folder).
WebM Compression Guidelines
For users working with WebM videos, follow these steps to effectively compress your videos using
ffmpeg:File Format: Use the
.webmfile format.Video Codec: Use the
libvpx-vp9encoder (VP9 codec) for best browser compatibility.Audio Codec: Use the
vorbisaudio codec.Compression Guidelines:
Short Videos: Videos with a duration of 5–10 minutes should be roughly less than 15 MB.
Long Videos: Video lectures with a duration of approximately 1 hour should not exceed 200 MB.
Resolution: High-resolution videos should be converted to lower resolution formats as per the guidelines for MP4.
Here’s an example ffmpeg command for compressing WebM:
ffmpeg -i inputfile.webm \
  -b:a 32k -ac 1 \
  -vf scale="'w=-2:h=trunc(min(ih,480)/2)*2'" \
  -crf 32 \
  -v error -strict -2 -stats \
  -c:v libvpx-vp9 -b:v 0 -deadline good -cpu-used 1 \
  -y outputfile.webm
This command takes the inputfile.webm and outputs the file outputfile.webm that
has the following transformations applied to it:
Limits the audio codec to 32k/sec
Scale the video to max-height of 480 pixels
Compress the video with CRF of 32 (constant rate factor)
Looking around with ffprobe
Equally useful is the command ffprobe which prints detailed information for
any video files. To illustrate the usefulness, let’s see what info ffprobe
can tells us about some video files downloaded from the internet. You can download
the same files from here
if you want to follow along (download the three different video formats available
in the sidebar: ogv, mpg, and mp4)
To check what’s in the file CM_National_Rice_Cooker_1982.ogv use the command:
ffprobe  CM_National_Rice_Cooker_1982.ogv

Input #0, ogg, from 'CM_National_Rice_Cooker_1982.ogv':
  Duration: 00:00:15.03, start: 0.000000, bitrate: 615 kb/s
    Stream #0:0: Video: theora, yuv420p,
                 400x300 [SAR 1:1 DAR 4:3], 29.97 fps, 29.97 tbr, 29.97 tbn, 29.97 tbc
    Stream #0:1: Audio: vorbis, 44100 Hz, stereo, fltp, 128 kb/s
The video codec is theora and the audio codec is vorbis, so this video will
need to be converted before uploading to Studio.
Similarly we can check the codecs for CM_National_Rice_Cooker_1982.mpg using
ffprobe  CM_National_Rice_Cooker_1982.mpg

Input #0, mpeg, from 'CM_National_Rice_Cooker_1982.mpg':
Duration: 00:00:15.02, start: 0.233367, bitrate: 6308 kb/s
  Stream #0:0[0x1e0]: Video: mpeg2video (Main), yuv420p(tv, smpte170m, top first),
                      720x480 [SAR 8:9 DAR 4:3], 29.97 fps, 29.97 tbr, 90k tbn, 59.94 tbc
  Stream #0:1[0x1c0]: Audio: mp2, 48000 Hz, stereo, s16p, 224 kb/s
The video codec is mpeg2video and the audio codec is mp2, so this video too
will need to be converted.
Finally, to check the codecs for CM_National_Rice_Cooker_1982.mp4, we use
ffprobe  CM_National_Rice_Cooker_1982.mp4

Input #0, mov,mp4,m4a,3gp,3g2,mj2, from 'CM_National_Rice_Cooker_1982.mp4':
  Duration: 00:00:15.05, start: -0.012585, bitrate: 835 kb/s
    Stream #0:0(und): Video: h264 (Constrained Baseline) (avc1 / 0x31637661), yuv420p,
                      640x480 [SAR 1:1 DAR 4:3], 700 kb/s, 29.97 fps, 29.97 tbr, 30k tbn, 59.94 tbc (default)
    Stream #0:1(und): Audio: aac (LC) (mp4a / 0x6134706D), 44100 Hz, stereo, fltp, 129 kb/s (default)
Here we see the h264 video codec and aac/mp4a audio codec so this file can
be uploaded to Studio as is. These codecs are relatively well supported by
most browsers.
This video can be uploaded to Kolibri.
Converting files using ffmpeg
Recall the file CM_National_Rice_Cooker_1982.mpg that we downloaded above,
which uses the Kolibri-incompatibe codecs mpeg2video and mp2.
Let’s see how to use the ffmpeg command to convert it to the supported codecs:
ffmpeg -i CM_National_Rice_Cooker_1982.mpg \
  -b:a 32k -ac 1 \
  -vf scale="'w=-2:h=trunc(min(ih,480)/2)*2'" \
  -crf 32 \
  -profile:v baseline -level 3.0 -preset slow -v error -strict -2 -stats \
  -y compressed.mp4
Note the \ character denotes line-continuation and works only on UNIX.
Windows users should put the entire command on a single line:
ffmpeg -i CM_National_Rice_Cooker_1982.mpg -b:a 32k -ac 1 -vf scale="'w=-2:h=trunc(min(ih,480)/2)*2'" -crf 32 -profile:v baseline -level 3.0 -preset slow -v error -strict -2 -stats -y compressed.mp4
This command will run for some time (video transcoding takes a lot of CPU power).
In the end, if you check using ffprobe compressed.mp4, you’ll see that the
converted output file has video codec h264 and audio codec aac.
The resolution 720x480 and bitrate 534 kb/s are also very good parameters.
Note the file size of compressed.mp4 is 1MB which is twice smaller than the
file mp4 file which we obtained directly form the web CM_National_Rice_Cooker_1982.mp4.
Clearly the compression option -crf 32 had an effect.
The video compressed.mp4 is now ready for upload to Studio!
Using the ffmpeg helper scripts for MP4
We provide a helper script to help run the ffmpeg command. The instructions are different depending if your operating systems is Windows or Mac/Linux:
For Windows users, download the file convertvideo.bat and save it to your computer. Make sure the extension is
.bat(Windows batch file). Put theconvertvideo.batfile in the same folder where you copiedffmpeg.exe. To convertinputfile.mp4tooutputfile.mp4using the conversion script, open a command line prompt, navigate to the folder whereconvertvideo.batandffmpeg.exeare stored, and type the following command:convertvideo.bat inputfile.mp4 outputfile.mp4
Linux and Mac users should download convertvideo.sh, save it to the folder where all the videos are. Next open a command prompt and change directory to that folder. Make the script executable using
chmod u+x convertvideo.sh, then you can start converting videos using:./convertvideo.sh inputfile.mp4 outputfile.mp4
See https://youtu.be/oKbCbuDlRmY for a video walkthrough of the steps and example usage of the batch script.
The conversion scripts provided are just wrappers for the ffmpeg command, to make it
easier for you so you won’t have to remember all the command line options. If you need
to adjust the conversion parameters, you edit the scripts—they are ordinary text files,
so you can edit them with notepad.
Note video conversion takes a long time, so be prepared to get a coffee or two.
Using the ffmpeg helper scripts for WebM
The helper scripts currently do not support WebM conversion. For WebM, please use the appropriate ‘ffmpeg’ command line as detailed above and adjust the command parameters manually.
HandBrake for MP4
If you don’t have many videos to convert, you can use HandBrake,
which is a video conversion tool with a graphical user interface. Handbrake uses
ffmpeg under the hood, so the same compression results can be achieved as with
the more technical options presented above.
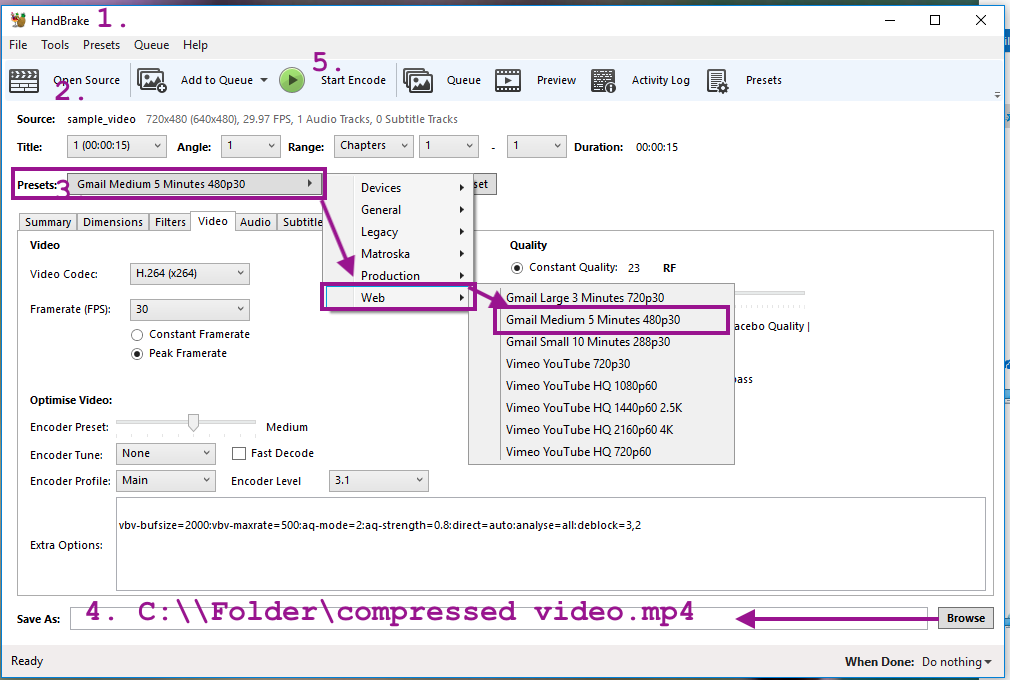
Here are steps for converting videos using HandBrake:
Download and install handbrake from here https://handbrake.fr/
Open the video file you want to compress.
From the presets menu, choose Web > Gmail Medium 5 Minutes 480p30
Set the output filename (e.g. you could use the same as input filename, but append
_compressed.mp4). Make sure to use the.mp4extension.Click the Start Encode button.
Here is a video guide to using HandBrake for compressing videos.
The Web > Gmail Medium 5 Minutes 480p30 preset will use the x264 video codec,
aac audio codec, and 480 vertical resolution, and compression rate crf=23.
The 480 vertical resolution is a good choice for most videos, but if you find the compressed output to be too low quality, you can try the preset
Web > Gmail Large 3 Minutes 720p30, which will result in larger videos files
with 720 vertical resolution.
If your channel contains many videos, or very long videos, you should consider increasing the “Constant Rate Factor” compression parameter in the Video settings. Using the value RF=32 will result in highly compressed videos, with very small file sizes.
HandBrake for WebM
If you prefer using a GUI tool, HandBrake can also help compress WebM videos, although it doesn’t natively support WebM output. In such cases you would convert the to MP4 first using HandBrake, and then re-encode it to WebM using the command above.
Experimenting with MP4 compression
Since every content source is unique, we recommend that you experiment with
different compression options. The command line tool ffmpeg offers a very
useful option called crf which stands for Constant Rate Factor.
Setting this single parameter allows for controlling overall video quality.
For example, setting crf=24 produces high quality video (and possibly large file size),
crf=28 is a mid-range quality, and values of crf above 30 produce highly-compressed
videos with small size.
Here are the steps to preview different compression factors in Kolibri:
Choose a sample video from your collection, let’s call it
video.mp4Try different compression options for it:
Create a CRF=24 version using
ffmpeg -i video.mp4 ... -crf 24 video_crf24.mp4Create a CRF=28 version using
ffmpeg -i video.mp4 ... -crf 28 video_crf28.mp4Create a CRF=30 version using
ffmpeg -i video.mp4 ... -crf 30 video_crf30.mp4
Upload the original and the compressed version to a Studio channel
PUBLISH the channel and record the channel token
Import the channel into a Kolibri instance using the channel token
Test video playback on different devices (desktop and mobile browsers on all OSs)
Experimenting with WebM compression
Experimenting with WebM compression, like MP4, is key to achieving the right balance of quality and file size. Adjust the crf parameter for different compression levels based on the desired video quality.